


Solo travel in Southeast Asia is the easiest globally for nervous first-timers. Use a 60-day preparation system to transform anxiety into readiness. Cost: $50-70/day.
You’ve bought the ticket—or you’re hovering over “Book Now” with your heart racing. Part of you knows this solo trip to Southeast Asia could change everything. The other part is running through every worst-case scenario at 2am.
Here’s what most travel blogs won’t tell you: That knot in your stomach isn’t a sign you shouldn’t go. It’s a sign you’re taking yourself seriously. And that’s exactly the energy we need to channel into preparation, not panic.
After 20+ years guiding nervous first-timers through their solo debuts in Southeast Asia, I’ve learned this: The travelers who succeed aren’t the fearless ones. They’re the ones who transform their anxiety into a preparation checklist.
This is that checklist. Let me show you the complete First-Timer’s Readiness System.
Who This Guide Is For
This complete guide is designed for you if you’re:
- Planning your first solo trip to Southeast Asia (or hovering over the decision)
- Experiencing legitimate anxiety about safety, loneliness, or logistics
- Needing structured preparation (not “just wing it” advice)
- Wanting confidence through systems, not blind courage
What you’ll learn:
- The First-Timer’s Readiness System: A proven 60-day preparation framework
- The 5 best countries for first-time solo travelers with specific recommendations
- Sample itineraries for 2 weeks, 1 month, and 3 months of backpacking
- How to choose your first destination using the 3-Factor Decision Matrix
- Week-by-week preparation timeline that eliminates decision paralysis
- Safety systems designed specifically for nervous solo travelers (especially solo female travelers)
- Whether solo travel or a group tour is right for your first trip
- What real Reddit travelers recommend for nervous first-timers
- Budget planning that accounts for first-timer mistakes
- Tech setup that works even if you’re not tech-savvy
Why this approach works:
Most travel advice assumes you’re already confident. This guide assumes the opposite—that your anxiety is actually valuable information-seeking behavior. We’ll channel that into structured preparation, not dismiss it with “just be brave!”
My background:
I’ve spent 20+ years in Southeast Asia and guided hundreds of nervous first-timers through their solo debuts. The system you’re about to learn isn’t theory—it’s field-tested with real travelers who started exactly where you are now.
Is Southeast Asia Good for a First-Time Solo Trip?
Yes—Southeast Asia offers the world’s best infrastructure for first-timers: affordable ($30-70/day), extremely safe, easy to meet people in hostels, English widely spoken, and forgiving of mistakes.
Short answer: Yes. Southeast Asia is widely considered the best region in the world for first-time solo travelers.
Here’s why Southeast Asia consistently ranks as the #1 recommendation for nervous first-timers:
Why Southeast Asia Is Perfect for First-Timers
1. Well-Established Backpacker Infrastructure
Southeast Asia has decades of backpacker culture. This means:
- Hostels designed specifically for solo travelers to meet others
- Transportation systems built for tourist convenience (unlike, say, South America or Africa)
- English widely spoken in tourist areas (especially Thailand, Malaysia, Singapore)
- Every city has a “backpacker district” where you’ll instantly find your people
2. Incredibly Affordable
- Daily budgets of $30-70 cover accommodation, food, activities, and transport
- Your money goes 3-5x further than traveling in Europe or North America
- Mistakes don’t break the bank (booked wrong bus? It’s $10 to fix, not $100)
3. Extremely Safe for Solo Travelers
- Violent crime against tourists is statistically very rare
- Countries like Singapore, Malaysia, and Thailand have lower crime rates than many Western cities
- Solo female travelers report feeling safer in Southeast Asia than in Europe or Latin America (our safety systems designed specifically for solo female travelers address every concern from accommodation security to transportation safety)
4. Easy to Meet People
- Hostel culture is social by default (common rooms, organized activities, group dinners)
- Every traveler you meet is also figuring it out—shared newbie status creates instant bonds
- The “Banana Pancake Trail” means you’ll see the same faces repeatedly as you travel
5. Forgiving Learning Curve
- Tourist infrastructure means help is always available
- Most first-timer mistakes are easily fixable
- Locals are accustomed to confused travelers and generally very helpful
The Bottom Line
If you’re asking “Is Southeast Asia good for a first-time solo trip?”—the travel community’s unanimous answer is yes, it’s ideal. The region was practically designed for nervous first-timers to build confidence safely.
The real questions are: Which country should you start with? and How do you prepare properly? That’s what the rest of this guide answers.
The Fear Audit: What You're Really Worried About
Before we solve anything, let’s name what we’re actually dealing with. Most first-time solo travelers experience four clusters of fear—and they’re all connected.
The 4 Fear Clusters
1. Safety & Physical Security
- Being targeted as a solo traveler
- Health emergencies with no backup
- Losing passport, money, or phone
2. Social & Emotional
- Eating alone looking pathetic
- Making no friends for entire trip
- Being too shy or awkward to connect
3. Logistics & Competence
- Booking wrong flights or accommodations
- Getting lost with language barriers
- Not knowing basic travel skills
4. Identity & Worth
- Coming home unchanged (wasting opportunity)
- Quitting early and admitting defeat
- Proving doubters right about your capabilities
Why This Matters
These fears aren’t random—they’re interconnected. Your social anxiety amplifies your safety concerns. Your logistics overwhelm feeds your identity fears. Traditional travel advice addresses them in isolation (“Here are 10 safety tips!”). The First-Timer’s Readiness System addresses them as a connected system.
Common Misconceptions
- “I need to be fearless” → No, you need to be prepared
- “Solo travel is only for extroverts” → Most successful solo travelers are introverts
- “I should just book and figure it out” → That works for confident travelers, not nervous first-timers
- “If I’m this anxious, maybe I’m not cut out for this” → Your anxiety is information-seeking, not weakness
If fear is keeping you from booking, our guide on how to overcome fear of traveling alone provides psychological tools and reframing techniques. For anxiety-specific strategies, see our complete guide to managing solo travel anxiety.
The First-Timer's Readiness System
The First-Timer’s Readiness System is a 60-day preparation framework designed specifically for nervous solo travelers. Instead of generic travel tips, it’s a systematic approach that transforms anxiety into structured readiness.
The Core Principle
Confidence doesn’t come from denying your fears. It comes from having concrete systems to address them. When you know exactly how you’ll handle getting sick, making friends, or navigating airports, anxiety transforms into preparedness. This approach—building confidence through structured preparation—is what separates successful first-timers from those who struggle.
Why This System Works
- Sequential, not overwhelming – One week of tasks at a time, not everything at once
- Fear-specific solutions – Addresses your actual concerns, not generic scenarios
- Decision frameworks – Removes paralysis with clear criteria
- Progressive confidence – Each completed week builds belief in your capability
The 5 System Components
Component 1: Diagnostic Assessment (Week 1-2)
- Fear Audit to identify your specific anxiety patterns
- Country Selection using the 3-Factor Decision Matrix
- Budget Reality Check for your financial comfort zone
- Timeline Selection based on your personality type
Component 2: Foundation Setup (Week 3-5)
- Tech Stack Assembly (apps, backups, emergency access)
- Safety Protocol Development (money, health, communication)
- Accommodation Strategy (first nights pre-booked, flexibility later)
- Transportation Planning (airport arrival, city navigation)
Component 3: Skills Building (Week 6-7)
- Language basics for your chosen country
- Cultural navigation (greetings, dining etiquette, temple rules)
- Social strategies (accommodation selection, tour types, meeting people)
- Confidence scenarios (what to do if X happens)
Component 4: Logistics Execution (Week 8-9)
- Booking flights, first accommodations, initial experiences
- Document preparation (passport, visas, copies, emergency contacts)
- Packing with systematic approach
- Pre-departure checklist completion
Component 5: Psychological Preparation (Week 9-10)
- Permission-giving framework (addressing guilt, doubt, imposter syndrome)
- Success metric reframing (what actually counts as “success”)
- First 48-hour survival blueprint
- Emergency response protocols
What Makes This Different
Most preparation guides are just checklists. This is a transformation system—by Week 10, you’re not the same person who started Week 1. You’ve built competence through structured preparation, not forced yourself to “be brave.”
The 5 Best Countries for First-Time Solo Travelers in Southeast Asia
Choosing your first destination is critical. Some countries are objectively easier for nervous first-timers than others. Here are the top 5, ranked by first-timer friendliness. For a detailed guide to choosing your first solo destination in Southeast Asia with personality quizzes and deeper decision-making frameworks, check our comprehensive destination selection guide.
#1: Thailand – The First-Timer Default Choice
Why Thailand is #1 for beginners:
- Most English spoken in tourist areas of any SEA country
- Best hostel culture for meeting people (Bangkok, Chiang Mai, islands)
- Excellent transportation infrastructure (trains, buses, domestic flights)
- Safest country in Southeast Asia for solo female travelers
- Abundant resources if something goes wrong
Top 3 Must-Do Experiences:
- Bangkok – Grand Palace, street food tours, rooftop bars, weekend markets
- Chiang Mai – Temples, cooking classes (best way to meet people), elephant sanctuaries
- Southern Islands – Koh Tao (diving), Koh Phi Phi (partying), Koh Lanta (relaxing)
Sample Mini-Itinerary (2 Weeks):
- Bangkok: 4 days (arrive, adjust, explore)
- Chiang Mai: 5 days (cultural immersion, social activities)
- Islands: 5 days (beach time, diving/snorkeling, relaxation)
Best for: High anxiety, social anxiety, need for infrastructure, extroverts
Ready for a deep dive? Our complete Thailand first-timer guide includes city-by-city breakdowns, accommodation recommendations, transportation booking strategies, cultural dos and don’ts, and week-by-week itineraries for 2 weeks to 3 months.
#2: Vietnam – The Adventurous First-Timer Choice
Why Vietnam ranks #2:
- More affordable than Thailand ($25-40/day vs $40-60/day)
- Incredible food scene (Hanoi and HCMC are foodie paradises)
- Good backpacking infrastructure, slightly more challenging than Thailand
- Rewards adventurous spirits with “authentic” cultural experiences
- Strong traveler community along the coast
Top 3 Must-Do Experiences:
- Hanoi – Old Quarter chaos, street food, Halong Bay day trips
- Hoi An – Ancient town, tailor-made clothes, lantern festival
- Ho Chi Minh City – War history, Cu Chi tunnels, nightlife
Sample Mini-Itinerary (2 Weeks):
- Hanoi: 3 days (arrival, orientation, Halong Bay)
- Hoi An: 4 days (relaxed pace, cultural immersion)
- Ho Chi Minh City: 3 days (history, food, energy)
- Mekong Delta: 2 days (rural experience)
- Da Lat or Nha Trang: 2 days (mountains or beach)
Best for: Medium anxiety, adventurous spirit, optimization-focused, foodies
Ready for Vietnam? Our complete Vietnam first-timer guide covers the full Hanoi-to-HCMC route, Ha Giang Loop preparation, train vs bus decisions, accommodation strategies, scam awareness, and optimized itineraries for every travel style.
#3: Malaysia – The Under-Rated Safe Choice
Why Malaysia deserves more attention:
- Ultra-safe (one of the safest countries in SEA)
- Excellent English (former British colony)
- Modern infrastructure meets cultural diversity
- Less touristy than Thailand (feels more “authentic”)
- Great food (Malay, Chinese, Indian fusion)
Top 3 Must-Do Experiences:
- Kuala Lumpur – Petronas Towers, street food, cultural neighborhoods
- Penang – George Town (street art, food capital), beaches
- Cameron Highlands – Tea plantations, cool climate, hiking
Sample Mini-Itinerary (2 Weeks):
- Kuala Lumpur: 3 days (city exploration, food tours)
- Penang: 4 days (cultural immersion, beach time)
- Cameron Highlands: 3 days (nature, tea plantations)
- Perhentian Islands or Tioman: 4 days (diving, snorkeling)
Best for: High safety anxiety, low chaos tolerance, English-speaking comfort, foodies
#4: Singapore – The “Training Wheels” Option
Why Singapore works for certain first-timers:
- Safest country in the world (literally)
- 100% English-speaking
- Zero culture shock (feels like a Western city)
- Perfect for 2-3 day “warm-up” before continuing to Thailand/Malaysia
- Excellent transit hub
Top 3 Must-Do Experiences:
- Marina Bay – Gardens by the Bay, Marina Bay Sands, skyline
- Hawker Centers – Affordable food ($3-5 meals) in expensive city
- Neighborhoods – Chinatown, Little India, Arab Street (cultural diversity)
Sample Mini-Itinerary (3-4 Days):
- Day 1: Arrive, Marina Bay, Gardens by the Bay
- Day 2: Neighborhoods (Chinatown, Little India), hawker food
- Day 3: Sentosa Island (beaches, Universal Studios) or Nature reserves
- Day 4: Departure to Malaysia or Thailand
Best for: Extreme safety anxiety, first-time out-of-country, need for familiarity, higher budgets
#5: Indonesia (Bali) – The Community Choice
Why Bali (specifically) works for first-timers:
- Instant community (yoga, surfing, digital nomad scenes)
- Beautiful (beaches, rice terraces, temples)
- Good infrastructure (Bali only—rest of Indonesia is harder)
- Wellness-focused travel (healing, spirituality, self-discovery)
Top 3 Must-Do Experiences:
- Ubud – Rice terraces, monkey forest, yoga studios, cultural heart
- Canggu – Surfer/digital nomad hub, cafes, beach clubs, coworking
- Uluwatu – Cliff temples, world-class surf breaks, beach clubs
Sample Mini-Itinerary (2 Weeks):
- Ubud: 5 days (yoga, culture, rice paddies, temples)
- Canggu: 5 days (surf, social scene, cafes, beach)
- Nusa Islands: 3 days (Lembongan or Penida – diving, beaches)
- Uluwatu: 1 day (temple, sunset, departure)
Best for: Community seekers, wellness focus, yoga/spiritual interests, higher budgets
Committed to Bali? Our complete Indonesia/Bali first-timer guide includes Ubud vs Canggu vs Seminyak comparisons, visa strategies, motorbike rental guidance, yoga studio recommendations, digital nomad scene navigation, and island-hopping plans.
Country Selection Summary
Thailand
Easiest (1/10)Vietnam
Medium (5/10)Malaysia
Easy (2/10)Singapore
Easiest (1/10)Cambodia
Medium (6/10)Bali
Medium (4/10)How to Choose Your Country
Use the 3-Factor Decision Matrix from the Readiness System:
Factor 1: Fear Profile
- High safety anxiety → Singapore, Malaysia, Thailand
- High social anxiety → Thailand, Bali
- High logistics anxiety → Singapore, Thailand, Malaysia
Factor 2: Chaos Tolerance (1-10)
- 1-4: Singapore, Malaysia, Thailand
- 5-7: Thailand, Bali, Vietnam
- 8-10: Vietnam, Indonesia beyond Bali
Factor 3: Connection Style
- Structured (tours, classes) → Thailand, Vietnam
- Organic (hostels, cafes) → Thailand, Bali
- Optional (comfortable alone) → Singapore, Malaysia
The Honest Default: If you’re unsure, start with Thailand. Specifically, fly into Bangkok, spend 3-5 days there, then head to Chiang Mai for a week. This gives you infrastructure, social opportunities, and confidence-building in the safest possible environment.
Planning Your Route: Sample Itineraries for 2 Weeks, 1 Month, and 3 Months
One of the biggest anxiety triggers for first-timers is: “But where exactly do I go, and in what order?” Here are proven routes that balance must-see destinations with realistic pacing for nervous travelers. Not sure how long your first solo trip should be? We break down the pros and cons of 2 weeks vs 1 month vs 3 months based on your goals and constraints.
The Classic “Banana Pancake Trail”
The Banana Pancake Trail is the well-worn backpacker route through Southeast Asia. It’s called this because Western-style restaurants serving banana pancakes are everywhere along the route—a symbol of the established tourist infrastructure.
The trail typically flows: Bangkok → Cambodia (Siem Reap, Phnom Penh) → Southern Vietnam → Central Vietnam → Northern Vietnam → Laos (Luang Prabang) → Northern Thailand
Sample Itinerary #1: The 2-Week First-Timer
Best for: Testing solo travel, limited time off work, budget of $1,500-2,000
Route: Thailand Only (Smart Strategy)
Days 1-4: Bangkok
- Day 1: Arrive, check into hostel, rest, explore neighborhood
- Day 2: Grand Palace, Wat Pho, river ferry to Wat Arun
- Day 3: Chatuchak Weekend Market (Sat/Sun) or day trip to Ayutthaya
- Day 4: Street food tour, rooftop bar, overnight train to Chiang Mai
Days 5-9: Chiang Mai
- Day 5: Arrive morning, Old City temples, Sunday Walking Street (if Sunday)
- Day 6: Cooking class (best way to meet people), evening food tour
- Day 7: Elephant sanctuary, evening chill at hostel
- Day 8: Doi Suthep temple, evening at local night market
- Day 9: Morning flight to Phuket or Krabi
Days 10-14: Southern Islands
- Days 10-11: Phuket (rest, beach, maybe Phi Phi day trip)
- Days 12-13: Railay Beach or Koh Lanta (rock climbing, beaches, kayaking)
- Day 14: Return to Bangkok, evening flight home (or extend!)
Why this route works:
- Single country = no visa complications, one currency, consistent language
- Hits diversity: megacity, culture/mountains, beaches
- Built-in social opportunities (cooking class, hostel activities)
- Flexible (can extend islands if loving it, skip if not)
Sample Itinerary #2: The 1-Month Multi-Country Route
Best for: Career break, more budget ($2,500-4,000), want variety
Route: Thailand → Cambodia → Vietnam (Classic Banana Pancake Trail)
Week 1: Thailand (Bangkok & Chiang Mai)
- Days 1-3: Bangkok (adjust, explore, street food)
- Days 4-7: Chiang Mai (cooking class, temples, elephant sanctuary, social hostel time)
Week 2: Cambodia (Siem Reap & Phnom Penh)
- Days 8-11: Siem Reap (Angkor Wat temples, pub street, night markets)
- Days 12-14: Phnom Penh (city, S21/Killing Fields history, riverside)
Week 3: Southern & Central Vietnam
- Days 15-17: Ho Chi Minh City (Cu Chi Tunnels, War Museum, street food)
- Days 18-21: Hoi An (ancient town, tailor clothes, lantern festival, beach)
Week 4: Northern Vietnam & Return
- Days 22-25: Hanoi (Old Quarter, Halong Bay overnight cruise)
- Days 26-27: Ha Giang Loop (3-day motorbike tour, if confident) OR Ninh Binh
- Days 28-30: Return to Hanoi, buffer day, fly home from Hanoi
Why this route works:
- Follows natural south-to-north flow (easy logistics)
- Hits iconic must-sees (Angkor Wat, Halong Bay, Hoi An)
- Built-in variety (cities, temples, beaches, history, nature)
- Popular route = always meeting other travelers
- Can be done in reverse (start Hanoi, end Bangkok)
Sample Itinerary #3: The 3-Month Deep Dive
Best for: Career break, sabbatical, major life transition, budget of $4,000-7,000
Route: Full Southeast Asia Loop (Thailand → Laos → Vietnam → Cambodia → Malaysia → Thailand Islands)
Month 1: Thailand & Laos (Weeks 1-4)
- Week 1: Bangkok (adjust, explore, get bearings)
- Week 2: Chiang Mai (cooking class, temples, elephant sanctuary)
- Week 3: Chiang Rai or Pai (slow down, nature) → Cross to Laos
- Week 4: Luang Prabang, Laos (waterfalls, monks, slow pace, Mekong river)
Month 2: Vietnam Full Route (Weeks 5-8)
- Week 5: Hanoi (arrive from Laos, explore, Halong Bay)
- Week 6: Ha Giang Loop or Ninh Binh → Train to Hue
- Week 7: Hoi An (rest week – beach, relaxation, tailors)
- Week 8: Da Lat → Nha Trang → Ho Chi Minh City
Month 3: Cambodia, Malaysia & Thailand Islands (Weeks 9-12)
- Week 9: Phnom Penh → Siem Reap (Angkor Wat, temples)
- Week 10: Cross to Malaysia – Penang (Georgetown, food, relax)
- Week 11: Perhentian Islands or Tioman (diving, snorkeling, beach break)
- Week 12: Return to Thailand – Krabi/Koh Lanta/Koh Tao (final beach week, departure)
Why this route works:
- Comprehensive without being rushed
- Natural geographic flow (no backtracking)
- Built-in rhythm (explore → rest → explore → rest)
- Flexibility to extend favorite places or skip if tired
- Ends on beach (perfect way to finish)
Budget Reality for 3 Months:
- Low budget: $3,000-4,000 ($35-45/day)
- Mid-range: $4,500-6,000 ($50-65/day)
- Comfortable: $6,500-8,000 ($70-90/day)
Route Planning Best Practices
For Any Length Trip:
- Book only first week accommodations – Leave rest flexible
- Allow 3 days minimum per city – Less = rushing, more = boredom (until Month 2+)
- Build in “rest weeks” – Every 10-14 days, slow down (beach town, quiet city)
- Follow the traveler flow – Popular routes exist for a reason (logistics work)
- Budget 20% buffer – First-timers underestimate costs and time
Common Routing Mistakes:
- ✗ Trying to see too much (8 cities in 2 weeks = exhausting)
- ✗ Booking entire trip in advance (no flexibility)
- ✗ Skipping rest days (burnout by week 3)
- ✗ Backtracking (doubles transport time and cost)
The Bottom Line: Less is more. Pick 2-3 countries maximum for your first trip. Master them. Build confidence. Return for the rest later.
How Do I Prepare for Solo Travel to Southeast Asia in 60 Days?
Use a 10-week system: Weeks 1-2 choose country and budget, Weeks 3-5 book essentials and insurance, Weeks 6-7 learn skills and apps, Weeks 8-9 handle logistics, Week 10 mental preparation.
The biggest mistake nervous first-timers make? Trying to prepare everything in the last two weeks. That’s how anxiety wins. This timeline spreads preparation across 10 weeks—each week builds on the last, and nothing is overwhelming.
WEEKS 1-2: DIAGNOSTIC PHASE
Week 1 Tasks:
- Complete the Fear Audit (identify your 4 fear clusters)
- Apply the 3-Factor Decision Matrix (choose your country)
- Set your budget comfort zone (realistic first-timer numbers)
- Decide trip length (2 weeks vs 1 month vs 3 months)
Week 2 Tasks:
- Research your chosen country (focus on preparation, not inspiration)
- Identify your first city (where you’ll land and establish base)
- Join 2-3 relevant Facebook groups (country-specific, solo travel communities)
- Start following 3-5 content creators who match your travel style
Checkpoint: By end of Week 2, you should have: Country selected, budget set, first city chosen, research resources identified
WEEKS 3-5: FOUNDATION SETUP
Week 3 Tasks:
- Get travel-specific credit card (no foreign transaction fees)
- Download and set up core apps (offline maps, translation, ride-sharing)
- Buy travel insurance (don’t skip this—anxiety reducer #1)
- Create document backup system (scan passport, visas, insurance)
Week 4 Tasks:
- Book first 3 nights accommodation (hostel if social, hotel if privacy)
- Book flight (flexible dates if possible for better pricing)
- Set up phone plan strategy (eSIM vs local SIM research)
- Create emergency contact protocol (who to call, how they reach you)
Week 5 Tasks:
- Set up money system (travel card, backup card, emergency cash plan)
- Create health preparation plan (medications, first-aid kit, insurance access)
- Book first “easy win” experience (arrival airport transfer or first-day tour)
- Set up safety protocols (money management, phone backup, emergency documents)
Checkpoint: By end of Week 5, you should have: Flight booked, first nights booked, tech stack ready, money systems in place, insurance active
WEEKS 6-7: SKILLS BUILDING
Week 6 Tasks:
- Learn 20 essential phrases in local language (thank you, excuse me, help, bathroom, how much)
- Study cultural basics (greetings, temple etiquette, dining customs)
- Research social strategies (hostel common room tactics, tour types, solo dining confidence)
- Plan first 48 hours in detail (arrival to Day 2 evening)
Week 7 Tasks:
- Practice using your apps (offline maps, translation, ride-sharing)
- Run through “what if” scenarios (sick, lost phone, missed flight, feel unsafe)
- Finalize packing list with systematic approach
- Review safety protocols (money, health, communication, emergency)
Checkpoint: By end of Week 7, you should have: Language basics learned, cultural preparation complete, social strategies identified, confidence scenarios rehearsed
WEEKS 8-10: FINAL PREPARATION
Week 8-9: Logistics Execution
- Book any additional experiences (tours, classes, transportation)
- Finalize accommodation strategy (how many nights pre-booked vs spontaneous)
- Complete document preparation (copies, emergency contacts, access codes)
- Do final budget review (daily spending, emergency buffer, splurge allowance)
Week 10: Psychological Preparation
- Permission-giving exercise (address guilt, doubt, imposter thoughts)
- Reframe success metrics (what actually counts as “success”)
- Create “if I need to leave early” exit plan (removes trapped feeling)
- Write yourself a departure day letter (encouragement for airport anxiety)
Final Checkpoint
You’re ready when:
- ✓ You know exactly what to do when you land
- ✓ You have systems for your 4 fear clusters
- ✓ You’ve addressed logistics, safety, and social concerns
- ✓ You feel prepared (not fearless—prepared)
Ready to take the next step? Our complete guide to traveling solo for the first time walks through everything from booking your first flight to handling the emotional rollercoaster of departure day.
How Do I Stay Safe When Traveling Solo in Southeast Asia?
Use a 3-layer safety system: Prevention (split money 3 ways, pre-book first nights), Response (insurance hotline, hostel staff for help), and Recovery (permission to change plans if needed).
Let’s address the fear that keeps most people from booking: “What if something bad happens?” The answer isn’t “nothing bad will happen” (that’s dismissive). The answer is: “Here are the exact systems that keep you safe.”
For our comprehensive safety and confidence systems, including advanced protocols for every scenario from minor theft to serious emergencies, see our complete safety cluster guide.
Is It Safe to Travel Southeast Asia Alone?
Short answer: Yes, Southeast Asia is statistically one of the safest regions for solo travelers, including solo female travelers.
Safety concerns are the #1 reason nervous first-timers delay booking. Here’s the reality:
- Violent crime against tourists is extremely rare
- Southeast Asian countries rank safer than many US/European cities
- Solo female travelers consistently report feeling safer in Thailand/Malaysia than in Europe
- The biggest actual risks are petty theft and traffic accidents—both preventable
The 3-Layer Safety System
Layer 1: Prevention (Stop problems before they start)
Money Safety:
- Never carry all money in one place (split: day wallet + hotel safe + emergency backup)
- Use a travel-friendly card for daily spending (instant freeze via app if lost)
- Keep emergency cash in hidden pocket ($200 USD – real emergencies only)
- Photograph credit cards front and back (store in cloud storage)
Physical Safety:
- Pre-book first 3 nights (arriving exhausted to find accommodation = vulnerability)
- Use official transport from airport (pre-booked ride-sharing, not random taxis)
- Stay in well-reviewed accommodations (central location, good lighting, secure entry)
- Trust your instincts (if something feels off, it probably is)
Digital Safety:
- Phone backup plan (offline maps downloaded, emergency numbers memorized)
- Document copies in 3 places (cloud, email to yourself, physical copies)
- Emergency contacts memorized (embassy, insurance, loved one)
- Secure connections for banking (avoid public wifi for sensitive transactions)
Layer 2: Response (What to do when problems happen)
If you get sick:
- Ask hotel or hostel staff for medical recommendations (they know good clinics)
- Call insurance hotline (they direct you to approved facilities)
- Contact embassy if serious (they have medical services list)
- Keep all receipts for insurance claims
If you lose your phone:
- Use hostel computer to log into device tracking
- Remotely lock phone, display message with hostel contact info
- Contact bank via computer (freeze cards if banking apps on phone)
- Buy basic replacement phone same day (Southeast Asia phones are affordable)
If you feel unsafe in a situation:
- Trust instinct immediately (don’t rationalize away discomfort)
- Exit to public space (hotel lobby, restaurant, busy street)
- Use emergency contact protocol (text designated person)
- Don’t worry about being “rude” or “overreacting”
Layer 3: Recovery (After something goes wrong)
Post-incident protocol:
- Give yourself permission to feel shaken (don’t minimize)
- Change locations if needed (new hostel, new city, even new country)
- Contact support system (friend, family, online community)
- Reassess trip continuation (leaving early isn’t failure—it’s self-care)
Safety Advice Specifically for Solo Female Travelers
What makes Southeast Asia particularly safe for women:
- Strong cultural respect for women in most countries (especially Thailand, Singapore, Malaysia)
- Well-lit tourist areas with constant foot traffic
- Female-only dorm rooms widely available
- Large community of solo female travelers (instant solidarity)
Additional precautions for solo women:
- Dress modestly when visiting temples (covered shoulders, knees)
- Avoid walking alone late at night in isolated areas (use ride-sharing)
- Book accommodations with strong female traveler reviews
- Trust your instincts about situations and people
- Don’t feel pressured to be “polite” if uncomfortable
Country-Specific Safety Nuances:
- Thailand: Very safe, respectful culture, minimal harassment
- Vietnam: Safe but more aggressive selling in tourist areas (not threatening, just persistent)
- Malaysia: Very safe, conservative Muslim areas require modest dress
- Singapore: Safest country on earth, zero concerns
- Indonesia (Bali): Safe in tourist areas, conservative outside Bali
Common Scams to Avoid
Taxi/Tuk-Tuk Overcharging:
- Solution: Use Grab or Bolt (Southeast Asian Uber) with fixed prices
“Closed Today” Scam:
- Taxi driver says temple/attraction closed, takes you to his friend’s shop instead
- Solution: It’s never actually closed. Ignore and insist on original destination
Gem/Tailor Shopping Scam:
- Friendly local recommends “special deal” at specific shop (they get commission)
- Solution: Only shop at places you research yourself
Motorbike Rental Damage:
- Rental company claims damage you didn’t cause
- Solution: Take extensive photos before leaving, rent from established companies only
Drink Spiking:
- Reality check: Extremely rare in Southeast Asia’s tourist areas
- Prevention: Standard precautions (watch your drink, don’t accept opened drinks)
Real Risk vs Perceived Risk
Statistically LOW risk (despite high fear):
- Violent crime targeting tourists
- Kidnapping or serious assault
- Drugged drinks in reputable venues
- Major health emergencies requiring evacuation
Statistically HIGHER risk (often overlooked):
- Petty theft (phones, wallets in busy areas)
- Traffic accidents (especially motorbike rentals)
- Food-borne illness (street food in wrong conditions)
- Sunburn and dehydration (sounds minor, can ruin days)
The confidence shift happens when you realize you’re not trying to eliminate all risk (impossible). You’re building systems that let you handle likely scenarios and respond to unlikely ones. That’s what transforms anxiety into preparedness.
What Apps Do I Need for Solo Travel in Southeast Asia?
Eight essential apps: Google Maps (offline navigation), Google Translate (camera translation), Grab (ride-sharing), WhatsApp (communication), travel money card, Maps.me (backup), XE Currency, and your insurance app.
You don’t need to be tech-savvy to travel solo—but you do need 8 essential apps set up before you land. Let’s build your stack in the order you’ll actually use them.
The Essential 8 (In Setup Order)
1. Google Maps (Setup Week 3)
- Download offline maps for first city before departure
- Save first accommodation, airport, embassy locations
- Test offline functionality before trip
- Why it matters: Works without data, prevents getting lost in unfamiliar areas
2. Google Translate (Setup Week 3)
- Download language pack for offline use
- Practice camera translation feature (point at signs and menus)
- Save common phrases (saved translations work offline)
- Why it matters: Language barrier anxiety reducer
3. Grab or Bolt (Setup Week 4)
- Create account with home credit card
- Verify phone number works internationally
- Practice booking ride to home address (then cancel)
- Why it matters: Removes taxi scam anxiety, transparent pricing
4. WhatsApp (Setup Week 4)
- Primary communication tool in Southeast Asia
- Install before trip, verify number
- Add hostel and hotel contacts you’ve booked
- Why it matters: How you’ll communicate with accommodations, tour operators, new friends
Need more communication strategies? Our complete communication tools and systems guide covers video calling, emergency communication, translation apps, and staying connected strategies in depth.
5. Money Management App (Setup Week 5)
- Order physical card 3-4 weeks before trip
- Set up app, link bank account, load initial funds
- Practice freezing and unfreezing card
- Why it matters: Best exchange rates, instant spending control
6. Maps.me (Setup Week 6)
- Download as Google Maps backup
- Offline maps for entire country available
- Better trail and path details than Google
- Why it matters: Full offline navigation backup system
Google Maps and Maps.me are foundational, but our complete navigation and location tools guide covers GPS trackers, location sharing for safety, and navigation strategies for areas with poor internet.
7. XE Currency (Setup Week 6)
- Quick converter for spending decisions
- Prevents overcharging anxiety
- Works offline once rates downloaded
- Why it matters: Confidence in prices you’re paying
8. Your Insurance App (Setup Week 8)
- Download provider’s app before departure
- Store policy number, hotline, claim process
- Screenshot key pages (work offline)
- Why it matters: Emergency medical assistance access
The Backup System
If your phone dies or gets stolen:
- Phone backup #1: Buy cheap local phone ($30-50, available everywhere)
- Phone backup #2: Access web versions via hostel computer
- Phone backup #3: Emergency contact has your itinerary and can communicate with accommodations
Document Backup:
- Cloud storage: Multiple copies in secure locations
- Email to yourself: Scans of passport, visa, insurance, credit cards
- Physical copies: One set with emergency contact at home, one in luggage
Common Tech Mistakes
- Not downloading offline maps (data runs out, you’re lost)
- Not setting up ride-sharing before landing (arriving tired makes taxi scams easier)
- Not testing apps before trip (discover problems too late)
- Over-downloading apps (8 essential beats 30 optional)
Non-Techie Reassurance:
If you can use a smartphone at home, you can use these apps abroad. The setup sequence above walks you through one app per week—nothing overwhelming. And Southeast Asia is so phone-friendly that you’ll see travelers of all ages navigating like pros.
How Much Does Solo Travel in Southeast Asia Actually Cost?
First-timers budget $50-70/day in Thailand/Vietnam ($2,000-2,600 for 2 weeks total including flights). Add 40% to seasoned traveler budgets because you’ll choose comfort over savings initially.
Most budget breakdowns assume you’re a seasoned traveler who knows how to find deals and avoid mistakes. This one assumes you’re a nervous first-timer who will make some expensive but confidence-building choices. That’s okay.
The First-Timer Budget Formula
Base Budget + Comfort Buffer + Mistake Budget = Realistic First-Timer Budget
How Much Should I Budget Per Day in Each Country?
Thailand:
- Seasoned traveler budget: $30-40/day
- Your first-timer budget: $50-70/day
- Why higher: Better accommodations ($15-25 vs $8), more restaurants vs street food, tours for social connection, occasional taxi vs always public transport
Vietnam:
- Seasoned traveler budget: $25-35/day
- Your first-timer budget: $45-60/day
- Why higher: Similar reasons, plus tour-heavy travel style initially
Indonesia (Bali):
- Seasoned traveler budget: $35-50/day
- Your first-timer budget: $60-80/day
- Why higher: Bali is pricier than other Southeast Asia destinations, first-timer choices lean expensive
Malaysia:
- Seasoned traveler budget: $40-55/day
- Your first-timer budget: $60-80/day
- Why higher: Mix of affordable and moderate options, first-timers choose moderate
Singapore:
- Seasoned traveler budget: $80-100/day
- Your first-timer budget: $100-130/day
- Why: Singapore is expensive, period (but worth it as warm-up destination)
Cambodia:
- Seasoned traveler budget: $20-30/day
- Your first-timer budget: $40-55/day
- Why higher: Better accommodations, guided tours vs independent, comfort choices
Budget Breakdown by Category
Accommodation (40% of daily budget):
- First 3 nights: $20-30/night (safety and location premium)
- After confidence builds: $15-25/night (can choose more affordable options)
- First-timer choice: Mid-range hostel with private room or budget hotel
- Why: Social anxiety around dorms, safety anxiety around ultra-budget
Food (25% of daily budget):
- Breakfast: $3-5 (hostel, hotel or cafe)
- Lunch: $4-7 (mix of street food and restaurants)
- Dinner: $6-10 (restaurant more often than street)
- First-timer pattern: More restaurants, less street food initially
Transportation (15% of daily budget):
- First-timer choice: Ride-sharing over public transport initially
- Why: Confidence builder, removes navigation anxiety
- As confidence grows: Shift to public transport mix
Experiences (15% of daily budget):
- Tours: $20-50 each
- First-timer pattern: More tours initially (social connection, guided safety)
- Classes and activities: $15-40 each
- Why these matter: Structured experiences build confidence faster
Miscellaneous (5% of daily budget):
- SIM card, toiletries, laundry, tips, unexpected needs
The Mistake Budget (Critical for First-Timers)
Add $300-500 to your trip budget for first-timer mistakes:
- Booking wrong bus or flight ($50-100 to fix)
- Emergency accommodation change ($50-100)
- Buying wrong SIM card ($20-30)
- Overpriced tours before research ($50-150)
- “Oops” purchases (wrong adapter, forgot item) ($50-100)
Don’t cut this buffer—it’s psychological safety.
Complete Trip Budgets (All-Inclusive)
2-Week Budget (Thailand Example):
- Daily expenses: $60/day × 14 days = $840
- First-timer mistake buffer: $400
- Round-trip flight: $600-1,200 (depending on origin)
- Travel insurance: $50-100
- Pre-trip setup: $100 (SIM, apps, gear)
- Visas (if needed): $0-100
- Total: $2,000-2,640
1-Month Budget (Thailand → Cambodia → Vietnam):
- Daily expenses: $55/day × 30 days = $1,650
- First-timer mistake buffer: $500
- Round-trip flight: $600-1,200
- Travel insurance: $100-150
- Pre-trip setup: $150 (SIM, apps, gear)
- Visas: $50-150
- Inter-country transport: $100-200
- Total: $3,150-4,000
3-Month Budget (Full Southeast Asia Loop):
- Daily expenses: $50/day × 90 days = $4,500
- First-timer mistake buffer: $800
- Round-trip flight: $600-1,500
- Travel insurance: $250-400
- Pre-trip setup: $200 (SIM, apps, gear)
- Visas: $150-300
- Inter-country transport: $300-500
- Total: $6,800-8,200
Cost-Saving Tips for Solo Travelers
Accommodation Hacks:
- Book dorm beds instead of private rooms (save 50-60%)
- Stay slightly outside tourist centers (save 30-40%)
- Use hostel kitchens for breakfast (save $3-5/day)
Food Savings:
- Eat street food confidently by Week 2 (save $10-15/day)
- Stick to local restaurants, avoid Western chains
- Take cooking classes (teach you cheap local dishes)
Transportation:
- Use overnight buses/trains (save accommodation + transport)
- Book transport directly, not through hotels (save 20-30%)
- Split taxi costs with hostel friends
Activity Savings:
- Free walking tours (tip-based)
- Beach/nature activities (free or cheap)
- Hostel-organized activities (cheaper than booking independently)
ATM & Currency Guide
Best Practice:
- Withdraw large amounts less frequently (minimize ATM fees)
- Use ATMs at banks, not convenience stores (better rates)
- Decline dynamic currency conversion (always choose local currency)
- Notify your bank before travel (prevent card blocks)
Expected Fees:
- Local ATM fee: $3-7 per withdrawal
- Your bank’s foreign transaction fee: 0-3% (get travel card with 0%)
- Exchange rate markup: 1-3% (unavoidable)
Money management is just one part of our complete booking and payments tech guide, which covers flight booking strategies, accommodation platforms, tour booking, and managing money across multiple countries.
Budget Anxiety Management
“What if I run out of money?” Keep $500 emergency fund separate (don’t touch). Credit card backup for true emergencies. You can always adjust spending or leave early and come home.
“This seems expensive for ‘budget’ travel” You’re investing in confidence, not just transportation. Budget travel advice assumes confidence you don’t have yet. Your costs will drop 30% by Week 2 as skills improve.
“How do I know if I’m being overcharged?” Use currency converter app (know real exchange rate). Check online for typical costs. Ask hostel staff “What should X cost?” Research typical prices in country-specific communities.
Want more budget details? Our detailed solo travel budget guide for Southeast Asia includes country-by-country breakdowns, money-saving strategies, budget tracking tools, and cost-cutting tactics that don’t compromise safety or experience.
Should I Travel Solo or Join a Group Tour in Southeast Asia?
Most nervous first-timers should start solo in Thailand—the infrastructure is so good that group tours are overkill. Tours cost 2-3x more ($80-150/day vs $50-70/day) and prevent skill-building.
One of the biggest decisions nervous first-timers face: Should I go completely solo, or book a group tour? Let’s break down the honest pros and cons.
Understanding Your Options
Pure Solo Travel:
- You plan everything yourself
- Complete freedom and flexibility
- Meet people organically (hostels, tours, random encounters)
- Budget-friendly (control every expense)
Group Tour (e.g., Intrepid, G Adventures):
- Itinerary pre-planned by company
- Accommodation, transport, guide included
- Group of 10-16 solo travelers (usually)
- Higher cost (convenience premium)
Hop-On-Hop-Off Bus Tours (e.g., Asia Backpackers):
- Middle ground: structured route, flexible timing
- Transport + some activities included
- Meet other travelers on bus
- More freedom than group tour, less planning than pure solo
Honest Pros & Cons Comparison
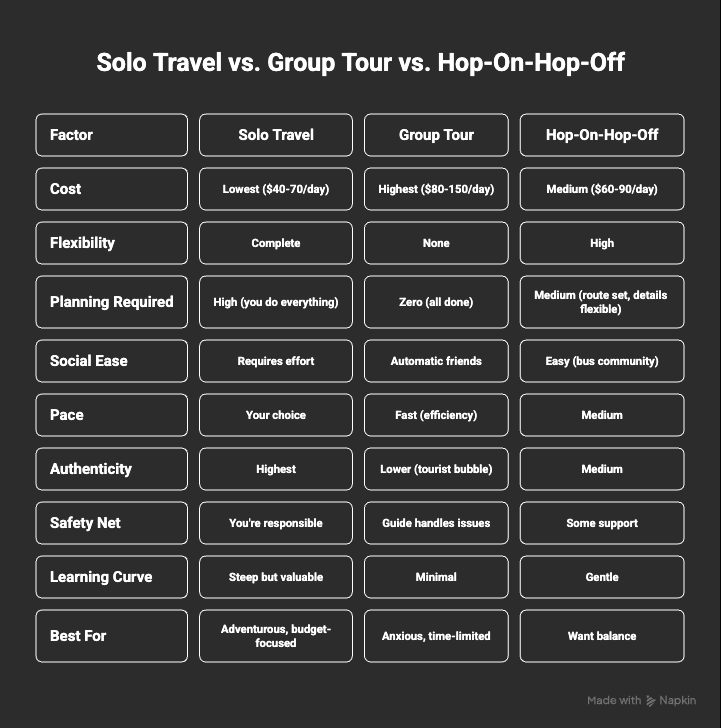
| Factor | Solo Travel | Group Tour | Hop-On-Hop-Off |
|---|---|---|---|
| Cost | Lowest ($40-70/day) | Highest ($80-150/day) | Medium ($60-90/day) |
| Flexibility | Complete | None | High |
| Planning Required | High (you do everything) | Zero (all done) | Medium (route set, details flexible) |
| Social Ease | Requires effort | Automatic friends | Easy (bus community) |
| Pace | Your choice | Fast (efficiency) | Medium |
| Authenticity | Highest | Lower (tourist bubble) | Medium |
| Safety Net | You’re responsible | Guide handles issues | Some support |
| Learning Curve | Steep but valuable | Minimal | Gentle |
| Best For | Adventurous, budget-focused | Anxious, time-limited | Want balance |
A Quick Quiz to Help You Decide
Choose Solo Travel If:
- ✓ Budget is tight ($2,000 or less for 2 weeks)
- ✓ You value flexibility over structure
- ✓ You’re comfortable with uncertainty
- ✓ You want to learn travel skills
- ✓ You’re okay putting in research effort
Choose Group Tour If:
- ✓ You have higher budget ($3,000+ for 2 weeks)
- ✓ You have limited time (1-2 weeks)
- ✓ You want zero planning stress
- ✓ Social anxiety is your #1 concern (instant friend group)
- ✓ You prefer guided experiences over figuring it out
Choose Hop-On-Hop-Off If:
- ✓ You want flexibility AND social opportunities
- ✓ Budget is medium ($2,500 for 2 weeks)
- ✓ You like having route decided but pace flexible
- ✓ You want transport handled but activities independent
- ✓ You’re nervous about planning but don’t want group tour rigidity
The Honest Recommendation
For most nervous first-timers: Start with pure solo travel in Thailand.
Here’s why this usually works best:
- Builds Actual Confidence
- Group tours create dependency, not competence
- Solo travel = skills you’ll use for life
- By Week 2, you’ll be navigating like a pro
- Budget Flexibility
- Solo = adjust spending as needed
- Group tour = committed to premium costs
- Money stress = anxiety, which defeats the purpose
- Thailand’s Infrastructure
- So easy for solo travelers that group tours are overkill
- Hostels make friend-making automatic
- Every problem has been solved before (help everywhere)
- Real Travel Skills
- Learning to book bus tickets, find hostels, navigate cities
- These skills matter for future trips
- Group tours deny you this learning
The Compromise Solution
If you’re truly anxious, try this hybrid approach:
Week 1: Book a 5-7 day group tour (warm-up)
- Intrepid, G Adventures, or local company
- Let them handle arrival, first accommodation, initial orientation
- Build confidence in safe bubble
- Meet other nervous travelers
Week 2+: Go solo with your new skills
- Use what you learned in Week 1
- Keep in touch with group tour friends (instant support network)
- Flexibility to explore at your pace
- Prove to yourself you can do it independently
Top-Rated Group Tours for Solo Travelers
For Nervous First-Timers:
- Intrepid Travel – “Thailand Intro” (9 days, ~$1,500)
- G Adventures – “Classic Thailand” (10 days, ~$1,600)
- Flash Pack – Thailand tours (30s/40s demographic, ~$2,500)
Southeast Asia Multi-Country:
- G Adventures – “Southeast Asia on a Shoestring” (3 weeks, $1,800)
- Intrepid – “Best of Southeast Asia” (28 days, $2,500)
Why These Work:
- Designed specifically for solo travelers
- Age-appropriate groups (usually 25-45)
- Small group sizes (12-16 people)
- Balance structured time + free time
- Accommodation in hostels or guesthouses (authentic experience)
The Bottom Line
There’s no “right” answer—only what’s right for you. Most people reading this guide have the capability to go fully solo and will be glad they did. But if a group tour eliminates enough anxiety to actually make the trip happen? That’s better than not going at all.
My bias: Start solo. Give it 5-7 days. If you’re truly miserable, you can always join a group tour mid-trip. But most people who take the leap discover they’re more capable than they thought.
Need psychological support for going solo? Our guide to mental preparation strategies for your first solo trip addresses the psychological barriers, impostor syndrome, and permission-giving exercises that help nervous travelers commit to solo travel.
Real Story: Maya's First 48 Hours in Bangkok
This is Maya—28, post-breakup, never solo-traveled internationally. Here’s how her first 48 hours actually went, anxiety and all.
Hour 1: Bangkok Airport Arrival
Maya’s hand shook as she turned on her phone. The ride-sharing app loaded—thank god. She’d practiced this exact booking at home. Airport to hostel: 250 baht ($7). The app showed her driver’s face, license plate, and real-time location.
What she was thinking: “What if the driver is creepy? What if I booked the wrong hostel?”
What actually happened: Driver was professional, barely spoke (relief—she was exhausted). Route matched her offline maps exactly.
Hour 3: Hostel Check-In
The common room was full. Extroverts laughing, sharing snacks, making plans. Maya wanted to disappear into her private room.
What she was thinking: “Everyone else seems so confident. I’ll never make friends.”
What actually happened: She followed the script from her preparation: Smiled at receptionist, asked for restaurant recommendations nearby, went to room to decompress. No pressure to socialize immediately.
Hour 8: First Solo Dinner
This was it—the moment she’d been dreading. Eating alone in public. She chose a busy street food area (safety in crowds) and a place with English menu and photos (decision-making easier when tired).
What she was thinking: “Everyone is staring at me alone.”
What actually happened: Nobody cared. She ordered pad thai by pointing, vendor smiled, food was delicious. She pulled out her phone (permission granted) and scrolled while eating. Twenty minutes, done.
Hour 24: The Breakthrough Moment
The temple tour guide introduced her to two other solo travelers—both also nervous first-timers. They grabbed lunch together after the tour. Exchanged contact info. Made tentative plans for tomorrow.
What changed: She realized she wasn’t the only anxious person here. Everyone was faking confidence until they built it.
Hour 48: End of Day 2
Maya sat in a coffee shop, writing in her journal (something she never did at home): “I did three things that scared me today and none of them killed me. I’m still anxious about tomorrow, but I know I can handle it because I handled today.”
What Maya Did Right
✓ Pre-booked first nights (eliminated arrival stress) ✓ Used ride-sharing (no taxi scam anxiety) ✓ Gave herself permission to skip socializing when tired ✓ Had structured activity Day 2 (temple tour created connections) ✓ Didn’t judge herself for feeling anxious (expected it, worked with it)
Six weeks later, Maya extended her trip by a month and is currently somewhere in Vietnam, meeting friends and navigating like a pro.
How Do I Avoid Feeling Lonely When Traveling Solo in Southeast Asia?
Stay in social hostels with high ratings, take cooking classes (3-4 hours builds natural friendships), join hostel activities, and be in common rooms during meals. Loneliness peaks Days 4-7 then decreases.
Let’s talk about the fear nobody puts in the title but everyone feels in their chest: “What if I’m lonely the entire time?”
When Will I Feel Most Lonely During My Trip?
Days 1-3: Exhaustion masks loneliness You’re too overwhelmed with logistics to feel lonely. Navigation, accommodation, food, sleep. Your brain is maxed out.
Days 4-7: The loneliness hits You’ve figured out basics. Now you notice you haven’t had a real conversation in days. You see groups of friends laughing. You eat dinner alone again. This is the danger zone.
Days 8-14: Connection patterns emerge You’ve figured out where and how to meet people. You have some recurring connections. Loneliness becomes occasional, not constant.
The Honest Truth
You will feel lonely sometimes. Solo travel without loneliness is like working out without soreness—if you’re never uncomfortable, you’re not growing. But there’s a difference between productive solitude and painful isolation.
The 3-Level Connection Strategy
Level 1: Shallow Connections (Daily)
- Hostel reception staff
- Tour guides and other tour participants
- Coffee shop baristas you return to
- Restaurant servers at regular spots
- Purpose: Human interaction, sense of belonging, no deep connection needed
Level 2: Medium Connections (Weekly)
- Other solo travelers you meet repeatedly
- Online community meetups
- Multi-day tour companions
- Hostel activity buddies
- Purpose: Shared experiences, temporary travel partners, ongoing communication
Level 3: Deep Connections (Rare but Powerful)
- Fellow travelers with similar journey stage
- Locals who become genuine friends
- Long-term travel companions
- Purpose: Real friendship, significant memories, potential lifelong connections
Where to Find Each Level
For Level 1 (Easy, Daily):
- Same coffee shop each morning
- Hostel common room during breakfast
- Popular street food spots
- Classes or workshops
For Level 2 (Medium Effort, Weekly):
- Hostel-organized activities
- Group tours (cooking classes, day trips)
- Solo traveler meetups in online groups
- Multi-day tours (island hopping, trekking)
For Level 3 (Organic, Can’t Force):
- Happens naturally from Level 2 connections
- Long conversations at hostels
- Shared challenging experiences
- Can’t be manufactured—be open when it arrives
How to Meet People When Traveling Solo
The Formula: Stay in social hostels + Book group activities + Say yes to invitations = Friends
Specific Tactics:
1. Choose the Right Hostel
- Read reviews specifically mentioning “easy to meet people”
- Smaller hostels (8-20 beds, not 200) = easier connections
- Look for hostels with common areas designed for socializing
- Check if they organize activities (pub crawls, dinners, tours)
2. Join Group Activities
- Cooking classes – #1 recommendation (3-4 hours together, eating at end, natural bonding)
- Free walking tours – Meet others casually, low commitment
- Day trips/tours – Shared experience creates connection
- Hostel-organized activities – Already vetted, easy to join
3. Common Room Presence
- Be in common areas during meal times
- Bring laptop/book (gives people opening to approach you)
- Join existing conversations (“Mind if I sit here?”)
- Play cards/board games (universal ice breaker)
4. Use Technology
- Facebook groups: “Solo Travelers in [City Name]” – Post asking to meet up
- Hostelworld reviews: Message people who recently stayed at your hostel
- Bumble BFF: Some travelers use this to find platonic friends
- Couchsurfing meetups: Not for accommodation, just social events
5. Take Initiative
- Invite someone from your hostel to dinner
- Ask “Anyone want to split a taxi to [attraction]?”
- “I’m doing [activity] tomorrow, want to come?”
- Most people are also looking for friends—make it easy for them
Want more actionable strategies? Our comprehensive solo travel tips for beginners covers everything from making friends to navigating cultural differences to handling homesickness.
Loneliness Management Tactics
When loneliness hits hard:
- Change your location (new hostel, new city, new country)
- Book a social activity (group tour tomorrow gives you something to look forward to)
- Call home (no shame in needing your people)
- Give yourself permission (alone ≠ lonely if you reframe it)
Strategic Booking for Social Success
- Hostels with high social ratings (read reviews specifically mentioning friend-making)
- Smaller hostels (8-20 beds, not 200—easier to connect)
- Common room design (one big table better than scattered seating)
- Hostel-organized activities (walking tours, group dinners)
Solo Dining Confidence
The progression most people follow:
- Week 1: Takeaway to room, eat alone in room (totally fine)
- Week 2: Restaurant with phone (give yourself permission)
- Week 3: Restaurant with book (less anxious than phone)
- Week 4: Restaurant just observing (actually enjoying solo time)
The Permission Framework
- Permission to be alone without being lonely
- Permission to need connection without being “needy”
- Permission to skip social events when exhausted
- Permission to change plans if current setup isn’t working
What successful solo travelers learn: You’re never truly alone in Southeast Asia—the infrastructure is designed for solo travelers. The question isn’t “Will I be lonely?” but “How will I manage the loneliness that inevitably comes, and where will I find the connections that matter?”
What Mistakes Do First-Time Solo Travelers Make in Southeast Asia?
Top mistakes: booking entire trip in advance (removes flexibility), rushing through 8+ cities in 2 weeks, choosing hotels over hostels (isolation), underbudgeting by 30-40%, and renting motorbikes without experience.
After guiding hundreds of nervous first-timers, these are the mistakes I see repeatedly—and the fixes that actually work.
Pre-Trip Planning Mistakes
Mistake #1: Booking entire trip in advance
- Why it’s a mistake: Locks you into itinerary before you know what you like, removes flexibility
- The fix: Book first 5-7 nights only, leave rest open
- If you already did this: Most bookings are cancelable—review policies, cancel anything more than 2 weeks out
Mistake #2: Choosing destination by Instagram aesthetics
- Why it’s a mistake: Visual appeal ≠ first-timer friendliness
- The fix: Use 3-Factor Decision Matrix (fear profile, chaos tolerance, connection style)
- If you already did this: You can still succeed—just adjust expectations and preparation
Mistake #3: Trip too short to build confidence OR too long to sustain
- Why it’s a mistake: Need 10-14 days minimum to get past survival mode, but 8+ weeks is burnout risk for first-timers
- The fix: 2-4 weeks is sweet spot for first trip
- If you already booked different: Plan shorter trip with extension option OR plan long trip with planned breaks
Money & Budgeting Mistakes
Mistake #4: Not having money backup system
- Why it’s a mistake: Single point of failure—lose one card, you’re stuck
- The fix: 3-card system (primary card, credit backup, emergency debit)
- If you already departed: Order replacement card to hostel, use credit card temporarily
Mistake #5: Underbudgeting first trip
- Why it’s a mistake: Anxiety increases when money is tight, makes bad decisions
- The fix: Add 40% to what you think you’ll spend
- If you’re already over budget: Cut experiences, not safety (affordable accommodations, less dining out, free activities)
Social & Psychological Mistakes
Mistake #6: Forcing yourself to be extroverted
- Why it’s a mistake: Burnout, inauthentic, exhausting
- The fix: Honor your introverted needs, find structured social activities
- If you’re already burnt out: Take 2 days completely alone to recharge
Mistake #7: Comparing your trip to others’ highlight reels
- Why it’s a mistake: Social media shows peaks, not reality
- The fix: Define your own success metrics before trip
- If you’re already feeling “less than”: Unfollow travel accounts temporarily, focus on your experience
Mistake #8: Not giving yourself permission to change plans
- Why it’s a mistake: Suffering through bad situation instead of adapting
- The fix: “Plan A didn’t work” permission statement
- If you’re miserable: Change something TODAY (new hostel, new city, new activity)
Safety & Logistics Mistakes
Mistake #9: Renting motorbike without experience
- Why it’s a mistake: #1 cause of serious injury for tourists
- The fix: Ride-sharing or bicycle instead
- If you already rented: Return it, get refund, don’t risk it
Mistake #10: Not backing up documents digitally
- Why it’s a mistake: Lose passport = nightmare without backup
- The fix: Scan everything to cloud plus email before trip
- If you haven’t done this: Do it today from hostel computer
The Meta-Mistake
Believing mistakes mean you’re not cut out for solo travel.
The Truth: Mistakes mean you’re learning. Every confident solo traveler made these same mistakes.
Troubleshooting Guide: "What If X Goes Wrong?"
SCENARIO 1: “I hate my hostel and it’s pre-paid”
What to do:
- Ask reception if you can change room type (maybe private room available)
- Check booking platform cancellation policy (many allow cancellation with notice)
- If non-refundable: Cut your losses, book new place for tomorrow
- Don’t suffer through 5 bad nights to save $50
When this is serious: Room feels unsafe, neighborhood is sketchy, staff is hostile How to tell difference: If you’d tell a friend “get out,” listen to yourself
SCENARIO 2: “I’m sick and don’t know what to do”
Minor illness (food poisoning, cold, exhaustion):
- Tell hostel staff (they’ll recommend pharmacy or clinic)
- Go to local pharmacy (extremely helpful, often speak English)
- Rest in room (skip activities, no guilt)
- Hydrate, electrolytes, simple food
Serious illness (high fever, severe pain, can’t function):
- Call travel insurance hotline immediately
- They’ll direct you to approved clinic or hospital
- Use ride-sharing to facility (don’t try public transport)
- Contact emergency contact back home (update them)
SCENARIO 3: “I lost my phone or it got stolen”
Immediate response (first 30 minutes):
- Use hostel computer to log into device tracking service
- Remotely lock phone, display message with hostel contact info
- Change critical passwords (email, banking, social media)
- Contact bank via computer, freeze cards if banking apps on phone
Within 24 hours:
- File police report if needed for insurance
- Buy basic smartphone ($30-80 in Southeast Asia)
- Download essential apps (Maps, messaging, ride-sharing, banking)
- Contact loved ones via web-based messaging, update them
SCENARIO 4: “I’m running out of money faster than expected”
Immediate budget cut:
- Move to more affordable accommodation ($10-15/night hostels exist)
- Street food only (skip restaurants temporarily)
- Free activities (walking tours, beaches, parks, temples)
- Public transport only (no more ride-sharing)
Extend funds:
- Ask family for emergency transfer (international transfer services)
- Credit card cash advance (expensive but available)
- Sell unused gear (online expat groups)
- Consider short-term hostel work (some offer bed for work)
SCENARIO 5: “I’m so lonely I want to go home”
Emergency loneliness protocol:
- Book group activity for tomorrow (cooking class, day tour)
- Move to social hostel immediately (research high social ratings)
- Post in solo travelers community asking to meet up
- Call or video chat loved one at home (no shame in needing support)
- Give yourself 3 days in new hostel before deciding to leave
When to actually go home:
- If you’ve tried everything above and still miserable after 7-10 days
- If anxiety or depression is seriously affecting mental health
- If physical safety feels compromised
- If you genuinely don’t enjoy travel (some people discover this—that’s okay)
SCENARIO 6: “I feel unsafe in this situation”
Trust your instincts ALWAYS. If something feels wrong:
- Exit immediately to public space (hotel, restaurant, busy street)
- Text your emergency contact: “Felt unsafe, now at [location], I’m okay”
- Use ride-sharing to return to accommodation (don’t save money, prioritize safety)
- Once safe: Assess if you need to report (police, accommodation, tour company)
- Process your feelings (call friend, journal, don’t minimize)
You’re not overreacting. You’re listening to survival instincts.
What Real Travelers on Reddit Recommend for First-Timers
I analyzed hundreds of Reddit threads from r/solotravel, r/travel, and Southeast Asia-specific subreddits to find the most consistent advice from experienced travelers who were once nervous first-timers themselves.
The Most Recommended “First” Country: Thailand (Unanimous)
Why Reddit loves Thailand for first-timers:
“Thailand is basically solo travel on easy mode. If you can’t figure it out there, solo travel might not be for you.” – u/backpackerlife
“Started in Bangkok, was terrified. Three days later I was booking buses, eating street food, and chatting with random travelers like I’d been doing it for years.” – u/nervousnomad
The Reddit consensus:
- Infrastructure so good that mistakes don’t matter
- Hostel culture makes friend-making automatic
- Cheap enough that financial stress doesn’t compound anxiety
- So well-trodden that every question has been asked before
Second choice: Vietnam (for those wanting more “adventure”)
The #1 Tip: Stay in Hostels, Not Hotels (Even If You Book Private Rooms)
The overwhelming Reddit advice:
“I booked hotels my first week because ‘I’m too old for hostels’ (I’m 32). Huge mistake. Moved to a hostel with a private room and instantly met people. Common areas are where the magic happens.” – u/solotraveler_mel
“Hostel ≠ dorm room. Get a private room in a social hostel. Best of both worlds: your own space + instant friend group.” – u/travel_therapy
Why this matters:
- Hotels = isolation (what you’re trying to avoid)
- Hostels = community (exactly what reduces anxiety)
- Private rooms in hostels = comfort + social opportunities
- Common rooms during breakfast/dinner = effortless connections
Recommended hostel chains for first-timers:
- Lub d (Thailand, Cambodia)
- Mad Monkey (Southeast Asia-wide)
- Bodega (Vietnam)
- Slumber Party (Thailand)
The Biggest Mistake: Rushing Through Too Many Places
Reddit’s most repeated warning:
“I tried to do 8 cities in 3 weeks. Spent entire trip on buses, exhausted, never made friends because I left right when I met people. Do 3-4 places max for your first trip.” – u/lessonlearned
“Slow travel isn’t boring travel. Spending 5-7 days per place means you actually relax, meet people, find your favorite spots. That’s when the magic happens.” – u/chiang_mai_nomad
The Reddit formula:
- 2 weeks: 2-3 cities maximum
- 1 month: 4-5 cities maximum
- 3 months: 8-12 cities maximum
- Stay 5-7 days minimum per place (not 2-3 days)
Most Recommended First-Timer Activities
1. Cooking Classes (Unanimous #1 Recommendation)
“Cooking class in Chiang Mai changed my trip. Spent 4 hours with the same group, then we all went for drinks after. Became my travel crew for the next two weeks.” – u/anxious_adventurer
Why Reddit loves them:
- 3-5 hours together (enough time to bond)
- Eating together at the end (natural friendship catalyst)
- Mixed solo travelers (everyone there to meet people)
- Activity-focused (takes pressure off “trying to make friends”)
Top recommendations:
- Chiang Mai cooking classes (any of them)
- Hoi An cooking classes
- Bangkok cooking tours
2. Free Walking Tours
“Join free walking tours in every new city. Meet other travelers, get oriented, learn history, and you can peel off with people for lunch after.” – u/budgetbackpacker
3. Overnight Tours (Halong Bay, Island Hopping)
“Halong Bay overnight cruise. Stuck on a boat with other travelers. By end of Day 2 we were all best friends. Traveled together for another month.” – u/vietnam_vet_traveler
Don’t Do: Motorbike Rentals (Without Experience)
Reddit’s #1 safety warning:
“Emergency rooms in Southeast Asia are full of tourists with motorbike injuries. Everyone thinks they can handle it. Most can’t. Just use Grab.” – u/expat_nurse_thailand
“Saw three separate tourists with casts/bandages at my hostel. All motorbike accidents. Not worth it.” – u/safety_first_always
The “It Gets Easier” Timeline (Crowd-Sourced)
Days 1-2: “What did I do? I want to go home.” Days 3-5: “Okay, I can do this. Still anxious but managing.” Days 6-8: “I’m actually… enjoying this?” Days 9-14: “I’m crushing it. Why was I so scared?” Week 3+: “I don’t want to go home.”
“Give it minimum 7 days before deciding if solo travel is for you. The first week is survival mode for everyone.” – u/seasoned_soloer
Reddit’s Favorite Resources
Apps Everyone Recommends:
- Rome2Rio (transport planning)
- Hostelworld (read the reviews, look for “social atmosphere”)
- Grab (Southeast Asian Uber)
- Maps.me (offline maps that work better than Google)
Communities:
- r/solotravel (best advice, supportive community)
- Facebook: “Solo Female Travelers in Southeast Asia”
- Facebook: City-specific backpacker groups
The Bottom Line from Reddit
“You’re overthinking it. Everyone on that sub was terrified before their first trip. Now we’re all out here doing it. You’ll be fine. Book the flight.” – u/just_do_it_traveler
Most upvoted comment across hundreds of threads: “The anticipation is worse than the reality. Once you’re there, you’ll figure it out. Everyone does.”
Pre-Travel Checklist for First-Timers
Here’s your simplified, actionable checklist for the essential tasks that must be completed before departure. This is separate from the 60-Day Timeline—think of this as your final “did I remember everything?” checklist.
Visas & Vaccinations
Visas:
- ☐ Check visa requirements for each country on your itinerary (use your passport nationality)
- ☐ Most Southeast Asian countries offer 30-day visa exemption for many nationalities
- ☐ Confirm current requirements (rules change—check official embassy websites)
- ☐ If visa required: Apply 4-6 weeks before departure
Country-Specific Visa Notes:
- Thailand: 60-day visa exemption for most nationalities (extendable 30 days)
- Vietnam: 45-day visa exemption for many nationalities (as of 2024, verify current rules)
- Malaysia: 30-90 day visa exemption (varies by nationality)
- Singapore: 30-90 day visa exemption (varies by nationality)
- Indonesia: 30-day visa exemption (extendable 30 days)
- Cambodia: Visa on arrival ($30) or e-visa online
- Laos: Visa on arrival or e-visa online
Vaccinations:
- ☐ No vaccinations are strictly required for Southeast Asia tourism
- ☐ Recommended (consult your doctor): Hepatitis A, Typhoid, Tetanus
- ☐ Consider: Hepatitis B (if long-term), Japanese Encephalitis (if rural areas)
- ☐ NOT needed: Yellow fever (unless coming from yellow fever country)
- ☐ Malaria pills: Only necessary for remote jungle areas (not typical tourist routes)
Flights & Accommodations
Flight Booking:
- ☐ Book flight 2-3 months in advance for best prices
- ☐ Consider multi-city ticket (fly into Bangkok, out of Hanoi) for one-way routes
- ☐ Check baggage allowance (many Asia flights only include carry-on)
- ☐ Screenshot confirmation and email to yourself
- ☐ Check passport validity (must be valid 6 months beyond your return date)
First-Night Accommodation:
- ☐ Book first 3-5 nights (hostel or hotel)
- ☐ Verify location is central/safe (read recent reviews)
- ☐ Confirm free cancellation policy if plans change
- ☐ Save address in Google Maps offline
- ☐ Screenshot booking confirmation
- ☐ Add hostel/hotel on WhatsApp for easy communication
Travel Insurance
Why it’s non-negotiable:
- Medical emergencies (hospitals won’t treat without insurance/payment)
- Trip cancellations or interruptions
- Lost/stolen belongings
- Emergency evacuation
What to do:
- ☐ Buy travel insurance (World Nomads, Safety Wing, or your bank’s travel insurance)
- ☐ Coverage should include: Medical ($100K minimum), evacuation, theft
- ☐ Download insurance app to phone
- ☐ Screenshot policy number and emergency hotline
- ☐ Email copy to yourself
- ☐ Share policy details with emergency contact at home
Cost: $50-150 for 2 weeks, $100-250 for 1 month, $250-400 for 3 months
Money & Banking
Before Departure:
- ☐ Notify bank of travel dates and countries (prevent card blocks)
- ☐ Get travel-friendly credit/debit card (no foreign transaction fees)
- ☐ Set up mobile banking app
- ☐ Know your PIN (you’ll need it for ATMs)
- ☐ Photograph credit cards front/back (store in cloud)
- ☐ Set up account alerts for every transaction
- ☐ Bring $200-300 USD cash as emergency backup
The 3-Card System:
- Card 1: Primary spending card (Wise, Revolut, or bank card with no fees)
- Card 2: Credit card backup
- Card 3: Emergency card (keep separate from others)
Packing Essentials
The Absolute Must-Haves:
- ☐ Passport (check expiration date—needs 6 months validity)
- ☐ Photocopies of passport (2 copies, keep separate from original)
- ☐ Credit/debit cards (minimum 2)
- ☐ Phone + charger
- ☐ Power bank (10,000mAh minimum)
- ☐ Universal adapter (Type A, C, G for Southeast Asia)
- ☐ Medications (bring 2x what you need, keep in original packaging)
- ☐ Basic first-aid kit (band-aids, pain reliever, anti-diarrhea pills, antibiotic ointment)
- ☐ Sunscreen (SPF 50, buy more there if needed)
- ☐ Insect repellent (DEET 30% minimum)
- ☐ Quick-dry towel (hostels don’t always provide)
- ☐ Lock for hostel lockers
- ☐ Reusable water bottle
- ☐ Daypack (for daily excursions)
Clothing (Pack Light):
- ☐ 3-4 t-shirts (quick-dry material)
- ☐ 2 pairs shorts/skirts
- ☐ 1 pair long pants (temples require covered legs)
- ☐ 1 lightweight long-sleeve shirt (sun/temple coverage)
- ☐ Underwear/socks for 5-7 days (wash as you go)
- ☐ Swimsuit
- ☐ Flip-flops (for hostels, showers, beaches)
- ☐ Comfortable walking shoes (already broken in)
- ☐ Light rain jacket
Tech:
- ☐ Smartphone (unlocked for international SIM)
- ☐ Charger cables
- ☐ Power bank
- ☐ Headphones
- ☐ Camera (optional—phone cameras are excellent now)
What NOT to Pack:
- ✗ Excessive clothing (you can buy or wash)
- ✗ Expensive jewelry
- ✗ Hair dryer (hostels have them, or you won’t need it in heat)
- ✗ More than 2 pairs of shoes
- ✗ Guidebooks (everything is online)
Digital Preparation
Apps to Download & Set Up Before Departure:
- ☐ Google Maps (download offline maps for first city)
- ☐ Google Translate (download language packs for offline use)
- ☐ Grab or Bolt (ride-sharing for Southeast Asia)
- ☐ WhatsApp (primary communication tool in Southeast Asia)
- ☐ Banking app (for money management)
- ☐ Maps.me (offline map backup)
- ☐ XE Currency (exchange rate converter)
- ☐ Your insurance company’s app
Digital Backups:
- ☐ Scan passport, visa, insurance, credit cards → upload to cloud (Google Drive, Dropbox)
- ☐ Email scans to yourself (accessible anywhere)
- ☐ Share travel itinerary with emergency contact at home
- ☐ Save important addresses: first hotel, embassy, emergency contacts
- ☐ Screenshot your flight confirmation
Emergency Contacts
Before You Leave:
- ☐ Designate emergency contact at home
- ☐ Share itinerary (flight details, first accommodation, general route plan)
- ☐ Establish check-in protocol (how often you’ll message, what platform)
- ☐ Give them copy of passport, insurance policy, credit card numbers
- ☐ Save these numbers in your phone:
- Your country’s embassy in each SEA country
- Travel insurance emergency hotline
- Bank’s international support number
- Emergency contact back home
Final 48-Hour Checklist
2 Days Before Departure:
- ☐ Confirm flight online (24 hours before)
- ☐ Print boarding pass or download to phone
- ☐ Pack bag (then remove 20% of items)
- ☐ Charge all electronics fully
- ☐ Withdraw some local currency or USD for arrival (airports have ATMs too)
- ☐ Triple-check passport, wallet, phone, tickets
Departure Day:
- ☐ Arrive airport 3 hours early (reduces stress)
- ☐ Text emergency contact when boarding
- ☐ Download offline entertainment (podcasts, books, shows)
- ☐ Breathe (you’ve prepared, you’re ready)
On Arrival (First 60 Minutes)
When you land:
- Buy SIM card at airport (30-60 minutes, well worth it)
- Use airport ATM for local currency ($100-200)
- Open Grab/Bolt app, book ride to accommodation
- Text emergency contact: “Landed safely, on way to hostel”
- Breathe again (hardest part is over)
Your Week-by-Week Action Plan (Starting Today)
Here’s your condensed action plan. Pick your current week and start there.
IF YOU’RE 10+ WEEKS OUT
This Week’s Focus: Foundation decisions
- Complete Fear Audit
- Apply 3-Factor Decision Matrix
- Choose country and first city
- Set budget range
Next Step: Week 8-9 tasks
IF YOU’RE 8-9 WEEKS OUT
This Week’s Focus: Logistics execution
- Book flight
- Book first 3-5 nights
- Buy travel insurance
- Order travel money card
Next Step: Week 6-7 tasks
IF YOU’RE 6-7 WEEKS OUT
This Week’s Focus: Skills building
- Set up all 8 essential apps
- Learn 20 phrases in local language
- Study cultural basics
- Plan first 48 hours in detail
Next Step: Week 4-5 tasks
IF YOU’RE 4-5 WEEKS OUT
This Week’s Focus: Final preparations
- Complete packing list
- Back up all documents digitally
- Finalize First 48 Hours Blueprint
- Run through emergency scenarios
Next Step: Week 2-3 tasks
IF YOU’RE 2-3 WEEKS OUT
This Week’s Focus: Psychological preparation
- Permission-giving exercises
- Reframe success metrics
- Write departure day letter to yourself
- Set up loved-ones check-in system
Next Step: Week 1 tasks
IF YOU’RE 1 WEEK OUT
This Week’s Focus: Final details
- Pack (then remove 20%)
- Triple-check documents
- Download offline maps
- Confirm first accommodation
- Deep breath—you’ve done the work
Next Step: You’re ready
THE NIGHT BEFORE DEPARTURE
- Phone fully charged plus charging cable packed
- Documents in one place (passport, insurance card, booking confirmations)
- Emergency contact has your itinerary
- Read your departure day letter
- Set 3 alarms (paranoia is normal)
- Try to sleep (you probably won’t—that’s fine)
DEPARTURE DAY
- Arrive airport 3 hours early (reduces anxiety)
- Text emergency contact when boarding
- Download offline entertainment
- When you land: SIM card first, then ride-sharing, then relax
The truth about readiness: You’ll never feel 100% ready. Somewhere around 75% prepared is when you need to go. That remaining 25%? You learn it on the ground. That’s the point.
🎁 Want the Day-by-Day Breakdown?
Feeling overwhelmed by all this information? I get it—that’s why I created the 60-Day First-Timer Readiness Checklist.
This free download gives you:
- Exact daily tasks broken down week by week
- Decision frameworks at each checkpoint
- Printable checklists you can physically check off
- Fear-specific preparation tracks
- Email support series to keep you on track
Join 1,000+ nervous first-timers who transformed anxiety into structured confidence.
Quick Reference Summary
If you remember nothing else, remember this:
The 5 Core Principles
- Anxiety is information-seeking, not weakness – Channel it into preparation
- Preparation builds confidence – Structure eliminates overwhelm
- Choose country for YOUR fears – Not Instagram aesthetics or friend recommendations
- 60 days of weekly tasks – Not 2 weeks of panic
- Success = showing up – Not perfect execution
Your First-Timer Essentials Checklist
- ✓ Country selected using 3-Factor Decision Matrix
- ✓ Flight plus first 3-5 nights booked
- ✓ Travel insurance purchased
- ✓ 8 essential apps set up and tested
- ✓ Money system established (primary card plus backup)
- ✓ Safety protocols learned (3-Layer System)
- ✓ First 48 hours planned in detail
- ✓ Emergency contacts and backups ready
- ✓ Permission given to yourself (to be nervous, to change plans, to succeed)
Critical Reminders
- You will make mistakes—budget for them
- You will feel lonely sometimes—prepare for it
- You won’t feel 100% ready—go anyway at 75%
- Bad moments ≠ bad trip—single events don’t define entire experience
- Leaving early isn’t failure—it’s self-awareness
Start here: Complete the Fear Audit in this guide. Everything else builds from there.
FAQ: First-Time Solo Travelers
Q: Is it safe to travel alone in Southeast Asia as a woman?
Yes—Southeast Asia ranks among the world’s safest regions for solo women, often safer than European cities, with violent crime against tourists statistically very rare.
Southeast Asian countries like Thailand, Singapore, and Malaysia rank among the safest globally. Standard precautions apply: stay aware of your surroundings, avoid walking alone late at night in isolated areas, dress modestly when visiting religious sites, and trust your instincts. The large community of solo female travelers means you’ll find solidarity and support everywhere you go.
Q: What is the best country in Southeast Asia for a first-time solo traveler?
Thailand is the unanimous #1 recommendation due to excellent infrastructure, widespread English, strong hostel culture, safety, and affordability. Start: Bangkok 3-5 days, Chiang Mai 5-7 days, islands 5-7 days.
If Thailand feels too touristy, Vietnam is the strong second choice for those wanting slightly more adventure while maintaining good backpacker infrastructure.
Q: How much money do I need for solo travel in Southeast Asia?
Budget $50-70/day as a first-timer: 2 weeks = $2,000-2,600 total, 1 month = $3,150-4,000 total, 3 months = $6,800-8,200 total (including flights, insurance, and mistake buffer).
2 weeks: $2,000-2,600 total (Thailand: $50-70/day + flight + insurance + mistake buffer) 1 month: $3,150-4,000 total (Thailand/Vietnam/Cambodia: $50-60/day average + flights + insurance + mistake buffer) 3 months: $6,800-8,200 total ($50-70/day average + flights + insurance + mistake buffer)
First-timer budgets run 30-40% higher than seasoned travelers due to comfort choices, tours for social connection, and inevitable mistakes. Your daily costs will decrease by Week 2 as you build confidence.
Q: What’s a good backpacking route for Southeast Asia?
The classic “Banana Pancake Trail”: Bangkok → Siem Reap → Phnom Penh → Southern Vietnam → Central Vietnam → Northern Vietnam → Laos → Chiang Mai. First-timers simplify: Thailand only for 2 weeks, or Thailand → Cambodia → Vietnam for 1 month.
The Classic “Banana Pancake Trail”: Bangkok → Siem Reap (Angkor Wat) → Phnom Penh → Southern Vietnam (HCMC) → Central Vietnam (Hoi An) → Northern Vietnam (Hanoi, Halong Bay) → Luang Prabang, Laos → Northern Thailand (Chiang Mai). This well-worn route has excellent infrastructure, natural geographic flow, and you’ll meet other travelers throughout. For a first trip, simplify: Thailand only (Bangkok → Chiang Mai → Islands) for 2 weeks, or Thailand → Cambodia → Vietnam for 1 month.
Q: Should I book a group tour or travel solo for my first time in Southeast Asia?
Start solo in Thailand—the infrastructure is so good that group tours are overkill. Tours cost 2-3x more ($80-150/day vs $50-70/day) but provide instant friends. Compromise: 5-7 day tour for Week 1, then solo for Week 2+.
For most nervous first-timers, start with pure solo travel in Thailand—the infrastructure is so good that group tours are overkill, and you’ll build actual confidence through experience. However, if social anxiety is your #1 concern and budget allows, consider a compromise: book a 5-7 day group tour (Intrepid, G Adventures) for Week 1 as a warm-up, then go solo with your newfound skills for Week 2+. Group tours cost 2-3x more than solo travel ($80-150/day vs $50-70/day) but provide instant friends and zero planning stress.
Q: How do I meet people when traveling solo in Southeast Asia?
Stay in social hostels with high ratings, take cooking classes (3-4 hours creates natural bonds), join hostel activities, be in common rooms during meals, and use Facebook groups to organize meetups. Most friendships form through shared activities.
The formula: Stay in social hostels + Book group activities + Say yes to invitations = Friends. Specific tactics: (1) Choose hostels with high social ratings and common areas (read Hostelworld reviews mentioning “easy to meet people”), (2) Take a cooking class (unanimous #1 recommendation—3-4 hours together creates natural bonds), (3) Join hostel-organized activities and free walking tours, (4) Be in common room during meal times, (5) Use Facebook groups like “Solo Travelers in [City Name]” to organize meetups. Most friendships form organically through shared activities, not forced small talk. For more social strategies and beginner tips, read our complete guide to solo travel tips for beginners.
Q: Is 2 weeks long enough for a first solo trip to Southeast Asia?
Yes—2 weeks is the minimum to get past survival mode (Days 1-3), push through loneliness (Days 4-7), and enjoy yourself (Days 8-14). Ideal first trip: 2-4 weeks. Focus on one country only (Thailand: Bangkok 4 days + Chiang Mai 5 days + Islands 5 days).
Anything shorter and you leave right when it gets good. The ideal first trip is 2-4 weeks. Longer than 4 weeks risks burnout without built-up travel stamina. For 2 weeks, focus on one country only (Thailand is perfect: Bangkok 4 days + Chiang Mai 5 days + Islands 5 days).
Q: Do I need to speak Thai/Vietnamese/Malay to travel solo in Southeast Asia?
No—English works well in tourist areas, especially Thailand, Malaysia, and Singapore. Google Translate with downloaded language packs and camera translation handles the rest. Learn 20 essential phrases (thank you, help, bathroom, how much) for respect.
It’s harder in Vietnam, Cambodia, and rural Indonesia, but Google Translate (download language pack for offline use) handles most situations. Your phone is your language solution—translation apps with camera features can read signs and menus instantly.
Q: What should I pack for my first solo trip to Southeast Asia?
Pack light—essentials only: passport (valid 6+ months), 2+ cards, phone/charger, power bank, adapter, medications (2x needed), sunscreen SPF 50, insect repellent, quick-dry towel, hostel lock, 3-4 shirts, 2 shorts, 1 long pants, swimsuit, flip-flops, walking shoes.
You can buy or wash items there. Leave at home: excessive clothing, expensive jewelry, hair dryer, more than 2 pairs of shoes.
Q: Do I need a visa for Southeast Asia?
Most nationalities get 30-day visa exemption on arrival for Thailand, Vietnam (45 days), Malaysia, Singapore, and Indonesia. Cambodia and Laos offer visa on arrival ($30) or e-visa. Always verify current rules 6-8 weeks before departure.
Thailand: 30-day exemption (extendable 30 days). Vietnam: 45-day exemption for many nationalities (verify current rules). Malaysia: 30-90 days depending on nationality. Singapore: 30-90 days depending on nationality. Indonesia: 30-day exemption (extendable). Cambodia: Visa on arrival ($30) or e-visa. Laos: Visa on arrival or e-visa. Always verify current requirements on official embassy websites 6-8 weeks before departure—rules change frequently.
Q: What if I get too lonely and want to come home?
Loneliness peaks Days 4-7 before improving. Emergency protocol: book a group activity tomorrow, move to social hostel, post in Facebook groups, video call home, give it 3 days. Most push through successfully by Week 2. Coming home isn’t failure—it’s self-awareness.
Loneliness typically peaks Days 4-7 before connection patterns emerge. Emergency protocol: (1) Book a group activity for tomorrow (cooking class, day tour), (2) Move to a highly-rated social hostel immediately, (3) Post in Facebook groups asking to meet up, (4) Video call loved ones (no shame in needing support), (5) Give yourself 3 days in the new environment before deciding to leave. Most travelers who push through report loneliness becomes manageable by Week 2. If you’ve tried everything and are still miserable after 7-10 days, coming home isn’t failure—it’s self-awareness.
Q: How long does it take to plan a first solo trip to Southeast Asia?
Start planning 8-12 weeks before departure using the 60-Day Preparation Timeline. This spreads tasks across 10 weeks: Weeks 1-2 (choose country), Weeks 3-5 (book essentials), Weeks 6-7 (learn basics), Weeks 8-9 (finalize logistics), Week 10 (mental prep).
Rushed planning in the final 2 weeks creates anxiety instead of confidence. If you have less than 8 weeks, focus on essentials: book flight and first 3 nights (Week 1), get insurance and set up apps (Week 2), then handle the rest as you go.
Q: What are the biggest mistakes first-time solo travelers make?
Top 5: booking entire trip in advance (removes flexibility), rushing through too many places (2-3 cities max for 2 weeks), choosing hotels over hostels (isolation), underbudgeting by 40%, and renting motorbikes without experience (#1 injury cause).
The meta-mistake: believing mistakes mean you’re not cut out for solo travel. Every confident solo traveler made these same mistakes—they’re part of learning.
Q: Is Southeast Asia expensive for solo travelers?
No—Southeast Asia is one of the most affordable regions globally. First-timer budgets: $40-50/day (budget), $60-80/day (mid-range), $90-120/day (comfortable). Significantly cheaper than Europe ($100-150/day), North America ($120-180/day), or Australia ($150-200/day).
Solo travelers don’t face significant “single supplements”—hostel dorm beds and private rooms are priced for individuals.
Q: How do I stay safe from scams in Southeast Asia?
Use Grab/Bolt (not taxis), ignore “closed today” claims (it’s never actually closed), only shop where you research yourself (not friendly local’s recommendation), take photos before renting motorbikes, watch your drink. Most “scams” are minor overcharging ($5-10), not dangerous.
Common scams and prevention: Taxi overcharging → Use Grab/Bolt with fixed prices. “Closed today” scam → Taxi claims attraction is closed, takes you to friend’s shop instead (it’s never actually closed; insist on destination). Gem/tailor shopping → Friendly local gets commission from specific shop (only shop where you research yourself). Motorbike rental damage → Rental claims damage you didn’t cause (take extensive photos before leaving, rent from established companies). Drink spiking → Extremely rare in tourist areas (standard precautions: watch your drink, don’t accept opened drinks).
Q: What’s the best time to visit Southeast Asia for solo travelers?
Aim for November-February (dry season) for best weather and most social opportunities—ideal for first-timers. March-May is very hot but cheaper. June-October is monsoon season (short afternoon rain, cheapest prices).
November-February (dry season, peak season): Best weather, most expensive, most crowded. Ideal for first-timers (predictable conditions, most social opportunities). March-May (hot season): Very hot (95-105°F), fewer tourists, cheaper prices. Manageable with AC accommodations. June-October (monsoon season): Rain patterns vary by country, cheapest prices, fewer tourists. Rain is usually short afternoon downpours, not all-day. For first-timers: Aim for November-February for easiest conditions. Thailand’s islands vary: Koh Samui/Koh Tao best November-February; Phuket/Krabi best November-April; rainy season shifts slightly by coast.
For a detailed seasonal guide to Southeast Asia including month-by-month weather patterns, festival calendars, and shoulder season strategies, see our complete seasonal planning guide.
Your Next Step (Starting Today)
You’ve read this complete guide. You understand the First-Timer’s Readiness System. You know Southeast Asia is doable for nervous beginners. You’re probably still anxious—that’s normal.
Here’s what separates people who go from people who dream:
The ones who go start with one small action today. Not booking the flight (that’s Week 8). Just one tiny step that moves you from “thinking about it” to “preparing for it.”
Your Immediate Next Action (Choose ONE)
Option 1: Complete the Fear Audit Write down your 4 fear clusters: Safety, Social, Logistics, Identity. Rank them 1-10 severity. This takes 10 minutes and reveals exactly what preparation you need.
Option 2: Download the 60-Day Checklist Get the complete day-by-day breakdown so you’re not reinventing the preparation system.
Option 3: Choose your country Apply the 3-Factor Decision Matrix right now. Fear profile × chaos tolerance × connection style = your first destination.
Option 4: Start Week 1 tasks today Even if you’re 10+ weeks out, starting feels better than circling. Join online communities, follow relevant creators, begin research.
The Truth About First-Time Solo Travel
Nobody feels ready. Not the confident-looking travelers in hostel common rooms, not the travel content creators, not the person who “just booked and went.” Everyone fakes confidence until they build it through small wins.
Your first small win is today. You read this far. That’s preparation already happening.
Start Week 1 tomorrow. You’ve got this.
About Zisco
I’m Zisco, founder of zisconueda.com and your guide to solo travel readiness.
My background:
- 20+ years living and traveling in Southeast Asia
- Guided hundreds of nervous first-timers through their solo debuts
- Started as an anxious first-timer myself (Bangkok, 2004, absolute mess)
- Now: Turn travel anxiety into structured preparation systems
Why I created this site:
Traditional travel advice assumes confidence you don’t have yet. It dismisses anxiety with “just be brave!” or “wing it!” That doesn’t work for nervous planners who need systems, not slogans.
I teach preparation-based confidence: When you have concrete protocols for your fears, anxiety transforms into readiness. That’s the Confidence Bridge methodology you’ve been reading.
Connect with me:
- Instagram: @zisconueda
- Email: info@zisconueda.com
Every confident solo traveler started as a nervous first-timer. Including me.
Essential Resources
Apps (The Essential 8):
- Google Maps (offline maps)
- Google Translate (camera translation)
- Grab (Southeast Asia ride-sharing)
- WhatsApp (regional communication standard)
- Money management card (travel-friendly banking)
- Maps.me (offline backup navigation)
- XE Currency (exchange rate calculator)
- Your travel insurance app
Online Communities:
- r/solotravel on Reddit (supportive, experienced community)
- Facebook: “Solo Female Travelers in Southeast Asia” (180K+ members)
- Facebook: Country-specific backpacker groups (Bangkok, Chiang Mai, Hanoi, etc.)
- Facebook: “Southeast Asia Backpacking”
Booking Platforms:
- Accommodation: Hostelworld, Booking.com, Agoda
- Experiences: GetYourGuide, Viator
- Insurance: Safety Wing, World Nomads, Allianz
- Transport: Rome2Rio (planning), 12Go Asia (booking)